Chapter 01 · Part 1
New User Registration
Creating an iSMS account is free and takes a few minutes. You’ll set up your login details, add your contact and company information, then activate the account by emailing your business documents to our team.
How to register
Follow the steps below to fill in the registration form. Register here to get started. Fields marked with an orange asterisk (*) are required.
From sign-up to sending
Fill the form
Login, personal & company details
Send company docs
For eKYC verification
eKYC approval
We review & approve
Account activated
Unlocked after approval
Log in & send
Start your first campaign
-
1
Open the registration page
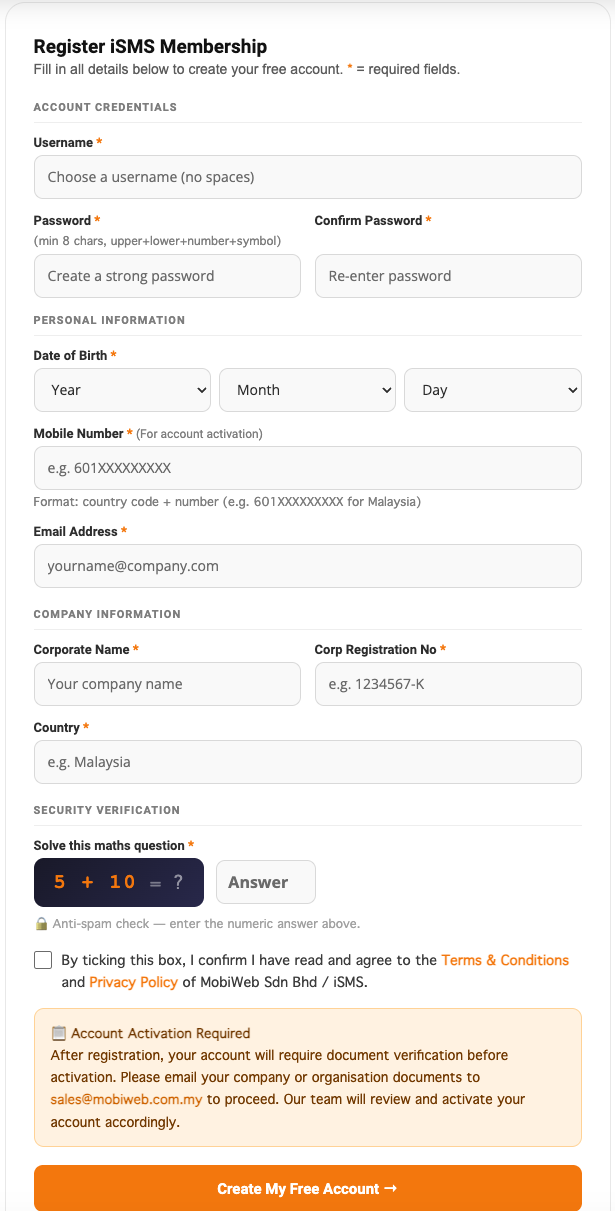
Click Register here to open the registration page in your web browser. You’ll see the Register iSMS Membership form shown below.
-
2
Enter your account credentials
Under Account Credentials, set the username and password you’ll use to log in:
- Username*Choose a username with no spaces. This is your iSMS login name.
- Password*At least 8 characters, mixing upper- and lower-case letters, a number, and a symbol.
- Confirm Password*Re-enter the same password to make sure it matches.
-
3
Fill in your personal information
This is how iSMS reaches you and activates your account:
- Date of Birth*Select your Year, Month, and Day from the dropdowns.
- Mobile Number*Country code + number, e.g.
601XXXXXXXXfor Malaysia. Used for account activation. - Email Address*A valid email — account notices and your login security code are sent here.
-
4
Add your company information
Under Company Information, enter your organisation’s details:
- Corporate Name*Your registered company or organisation name.
- Corp Registration No*Your company registration number, e.g.
1234567-K. - Country*The country your business is based in, e.g. Malaysia.
-
5
Pass the security check
Solve the short maths question shown (for example, 5 + 10 = ?) and type the number into the Answer box. This anti-spam check keeps automated sign-ups out.
-
6
Agree and create your account
Tick the box to confirm you agree to the Terms & Conditions and Privacy Policy of MobiWeb Sdn Bhd / iSMS, then click Create My Free Account.
-
7
Submit your documents for eKYC approval
As part of eKYC (electronic Know-Your-Customer) checks, every new account must be verified before it can send. Email your company documents to sales@mobiweb.com.my — our team reviews them and, once approved, activates your account. Please include:
- Company Registration Certificate
- Company Website
- Company Address
- Company Utility Bill (issued within the last 3 months)
Once your account is activated, you’re ready to log in to iSMS and send your first message.