Chapter 30 · Part 4
WABA Scheduler
Don’t need to send right now? Schedule a WhatsApp template send to your CSV list for later — once, or repeating daily, weekly, or monthly — then track every run from the Scheduler monitor.
How scheduling works
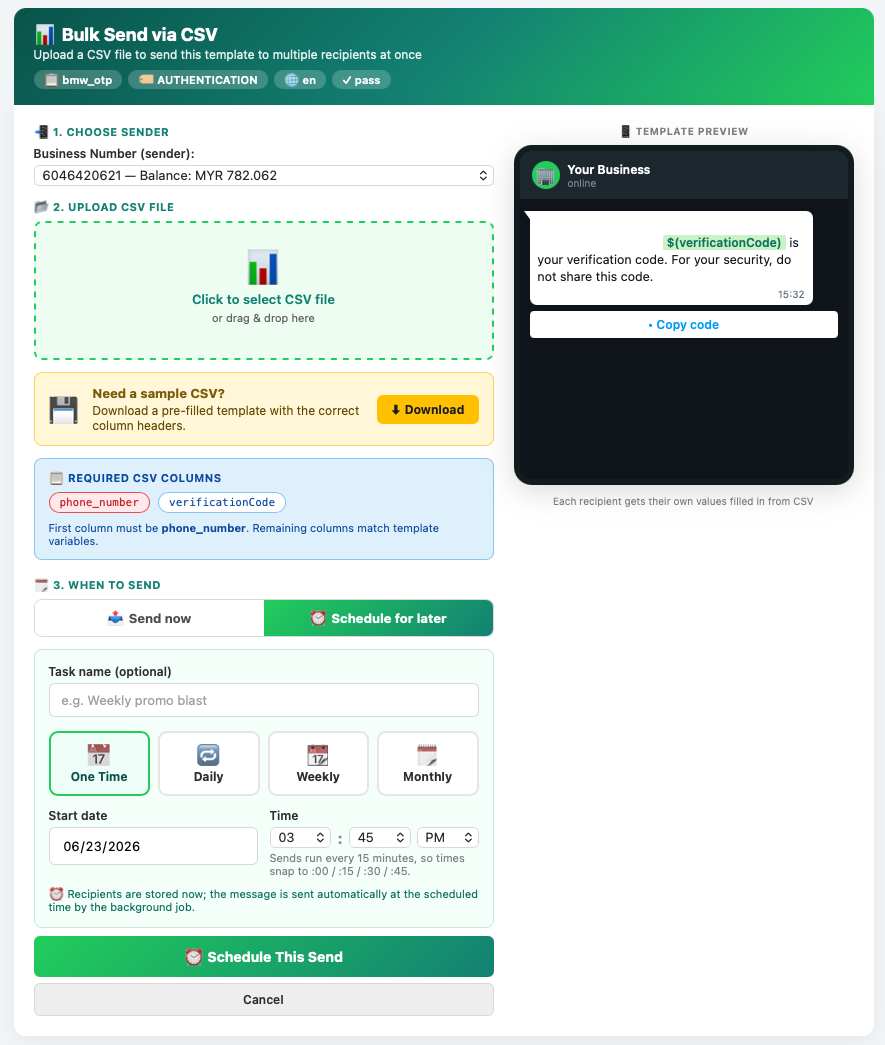
Scheduling starts from the same screen as a normal bulk send. From Template List, open Actions → Send → Bulk Send via CSV, set the sender, template, and CSV exactly as in a bulk send, then in the When to send panel choose Schedule for later instead of Send now.
From set-up to automatic send
Set up the send
Sender, template, CSV
Schedule for later
Instead of Send now
Pick trigger & time
Once or repeating
Saved as queued
Waits for its time
Runs automatically
At the scheduled time
Schedule a send
- 1
Set up the send
Choose the Business Number to send from and upload your recipient
.csv, exactly as in a normal bulk send — first columnphone_number, then one column per template variable. - 2
Choose “Schedule for later”
In the When to send panel, switch from Send now to Schedule for later. The scheduling options appear.
- 3
Name it (optional)
Give the schedule a Task name (and a description) so it’s easy to find later. Leave it blank and a name is generated for you.
- 4
Pick a trigger
Choose One Time, Daily, Weekly, or Monthly (see the next section).
- 5
Set the start date & time
Pick the date and time. Times snap to :00, :15, :30, or :45, because sends run on a 15-minute cycle.
- 6
Set the recurrence
For Weekly, tick the weekdays to repeat on; for Monthly, choose the day(s) and month(s). One Time and Daily need nothing extra.
- 7
Schedule it
Click Schedule This Send. Your recipients are stored now, and the schedule appears on the monitor as Queued, ready to run on its own.
Trigger types
One Time
Runs once, at the chosen date and time, then stops.
Daily
Repeats every day at the chosen time, from the start date.
Weekly
Repeats on the weekdays you select, at the chosen time.
Monthly
Repeats on the day(s) and month(s) you choose.
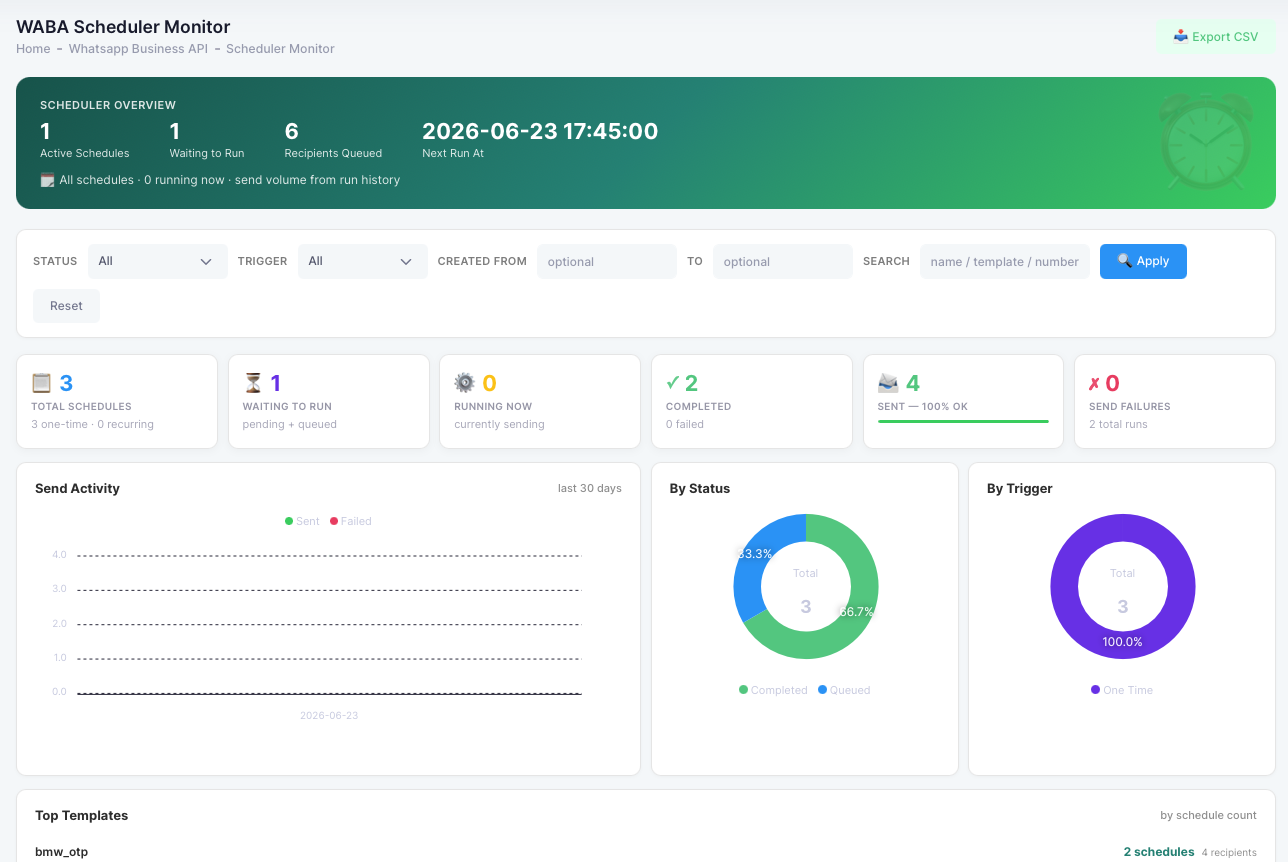
Track your schedules
Open Scheduler from the WABA menu (next to Outbound Message) to reach the monitor. It opens on all of your schedules — not just today’s.
Below the KPI cards are quick charts — a Send Activity trend (sent vs failed over time), a By Status donut, a By Trigger donut, and Top Templates ranked by how many schedules use each. A filter bar (status, trigger, created-date range, and a name/template/number search) narrows the list, and the whole list can be exported to CSV.
The schedule table has one row per schedule — task, trigger, status, sender number, template, recipient count (and how many are processed), last run (with its sent/failed split), next run, and created date — plus a View action, and Edit and Delete while they’re still allowed.
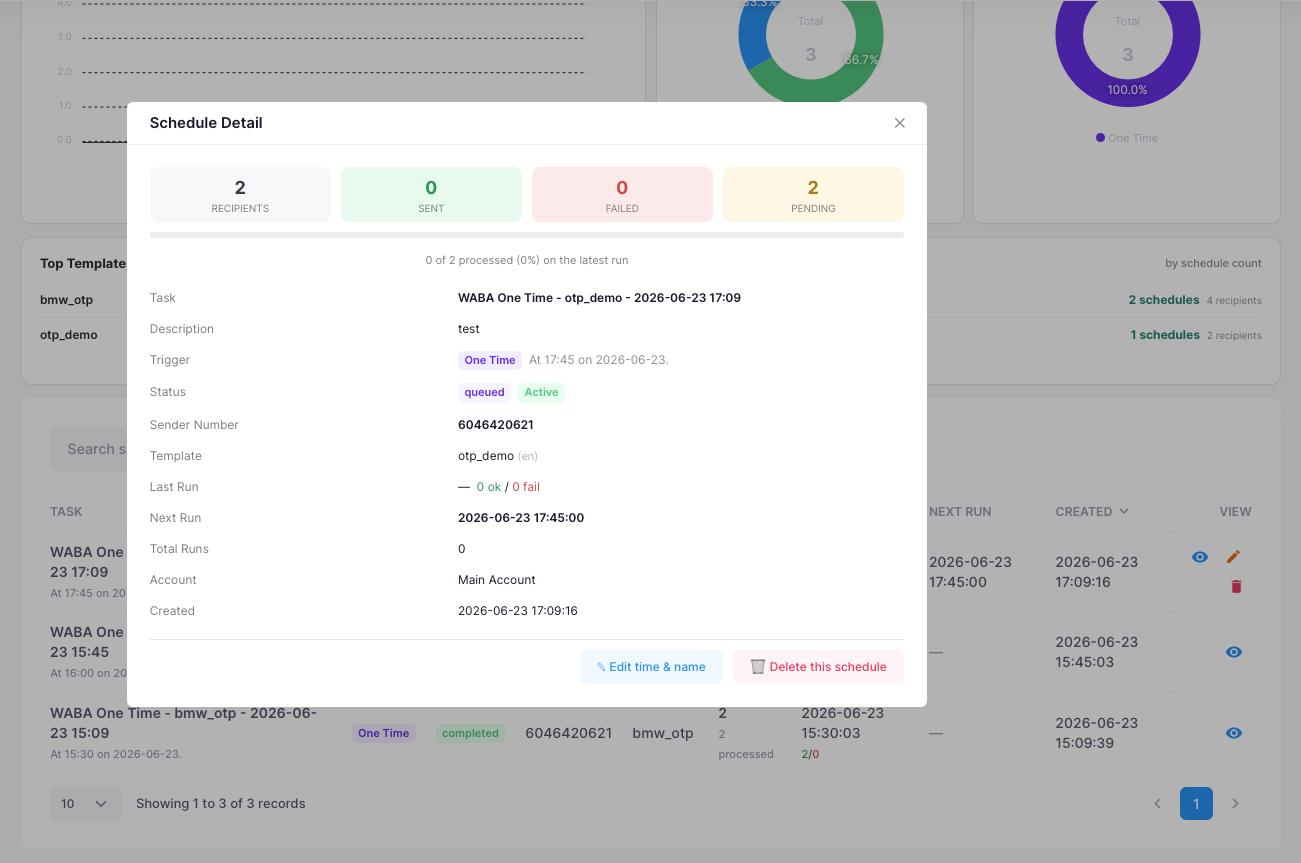
View a schedule’s detail
The View button opens a Schedule Detail panel for that schedule, showing:
- Recipient breakdownTotal, Sent, Failed, and Pending, with a progress bar for the latest run.
- Schedule infoTask and description, trigger and its timing, status and whether it’s active, sender number, template and language, last run (with sent/failed), next run, total runs, the owning account, and the created date.
- Edit & DeleteShown only while the schedule can still be changed (see the rule below).
Edit or delete a schedule
Use the row or detail-panel buttons:
- Edit — timing & naming onlyChange the task name, description, trigger, start date and time, and recurrence. The sender, template, and recipient list can’t be edited — to change those, delete the schedule and create a new one. The next run time is recalculated after you save.
- Delete — removes everythingPermanently removes the schedule, its queued recipients, and its run history, after a confirmation prompt.
Schedule statuses
- PendingBeing set up — recipients are still loading.
- QueuedReady and waiting for its scheduled time.
- ProcessingCurrently sending.
- CompletedA One Time send that has finished.
- FailedA run that did not succeed.
- Cancelled / PausedNot currently scheduled to run.
Active vs Inactive: “Active” means the schedule is still set to run. Recurring schedules stay active between runs; a One Time schedule becomes inactive once it has completed.